![]()
Making Marshmallow PEEPS
![]()
It took many long
hours to write this tutorial and put it up for your PSP pleasure.
I ask that you please do not distribute this tutorial in printed form
or in email to any group without my consent. A link back to this page or
to my site is Always Acceptible and Appreciated!
Thank You!
Damensha
![]() What you will need
What you will need ![]()
Paint Shop Pro - you can get a free 30 day trial version
HERE
My Selections File - peeps.zip
![]()
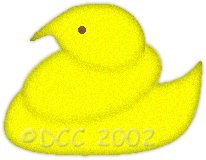
![]() MARSHMALLOW
CHICKS
MARSHMALLOW
CHICKS ![]()
LAYER #1 (Bottom)
1. Open a new image size 400x400, transparent, 16.7 million colors.
(This is WAY too big, but I like having the room)
Set your Foreground color to Yellow (#FFFF00) and your Background
color to Brown (#7F5341).
2. Go to Selections,
Load from Disk and open my bottom.sel file.
Flood Fill with Yellow.
3. Choose Selections - Float
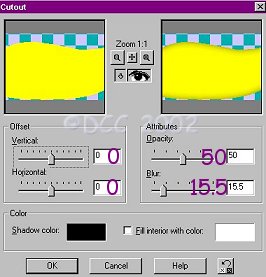
4. Go to Effects
/ 3D Effects / Cutout at these settings:
(You will use these same settings throughout the tutorials)
Deselect
LAYER #2 (Middle)
1. Go to Selections, Load from Disk and open my middle.sel
file.
Flood Fill with Yellow.
2. Choose Selections - Float
3. Apply the same
Cutout as Layer #1.
Deselect.
LAYER #3 (Head)
1. Go to Selections, Load from Disk and open my head.sel
file.
Flood Fill with Yellow.
2. Choose Selections - Float
3. Apply the same
Cutout as Layer #1.
Deselect.
4. Choose your
paintbrush tool ![]() using these settings:
using these settings:
(You will use this same setting for the Bunny as well)
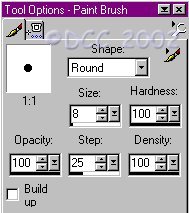
Draw a dot for your Peep's Eye.
5. Choose Layers - Merge - Merge Visible.
MERGED LAYER
1. Choose your Retouch tool ![]() using these settings:
using these settings:
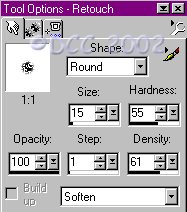
Soften the lines connecting the body parts to look like this:
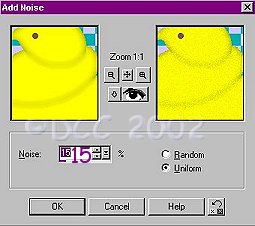
2. Go to Effects
- Noise - Add Noise at 15%.
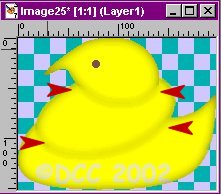
This should give your Peep that 'sugary' look. :)
This works well for Yellow but for other colors you may want
to use the technique from the PEEPS Bunny Tutorial below.
3. Go to Effects
- Drop Shadow and apply at these settings:
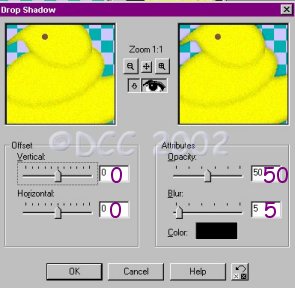
There You Go! Save it, tube it, and add a few to your Easter Basket! :)
![]()
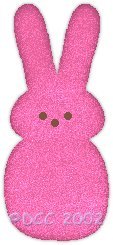
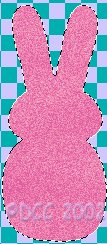
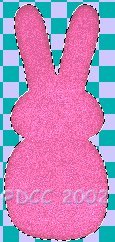
MARSHMALLOW BUNNIES
![]()
![]() This one's even easier than the last!
This one's even easier than the last!
LAYER #1
1. Set your Foreground color to Pink (#E7639C), and leave
your background color set to Brown.
2. Go
to Selections, Load from Disk and open my bunny.sel file.
Flood Fill with Pink.
*DO NOT DESELECT*
LAYER #2
1. Set your Foreground color to White.
2.
Choose your Airbrush Tool ![]() using
these settings:
using
these settings:
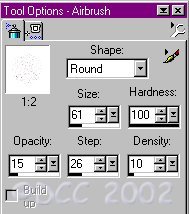
Lightly
spray inside your selection as shown:
3. Open your Layer
Pallet and change the Layer Blend Mode
to 'Dodge' and lower the Layer Opacity to 70% - 75%
(as low or high as looks good to you).

*DO NOT DESELECT*
LAYER #3
1. Choose
your paintbrush tool ![]() using the same settings as above to draw
using the same settings as above to draw
eyes and a mouth (or is it a nose? Do Peeps have noses? Hmmm....).
2. Go to Layers - Merge - Merge Visible.
3. Go to Selections - Float
4. Effects - 3D Effects - Cutout (same as for Chick)
*Now you can Deselect :)*
5. Effects - 3D Effects - Drop Shadow (same as for Chick)
SAVE :)
![]()
Thank You for trying my Tutorial!
I hope you enjoy the rest of the Parade! :)
If you have any questions, don't hesitate to ask!
Damensha